| |

At the finish of last months article we bolted into position the dashboard moulding, front bonnet and windscreen, so in the style of 'American Chopper' the next thing we did was take it all apart again! This is of course 'American Chopper' on Sky channel 551 and not the one after midnight on 986 or so Chad tells me!
The removal of these parts once again exposed the steering column support bar and under bonnet area whilst allowing for the dashboard moulding to be moved to one side as a separate unit, ready for the start of the installation of the gauges, fuse board and associated wiring away from the main build area.
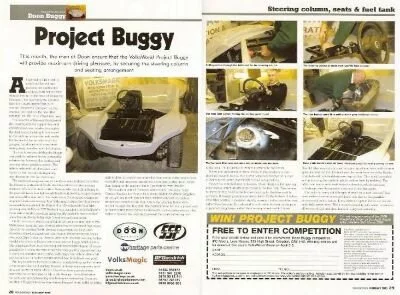
The key to making driving a Buggy a pleasurable experience is, without doubt, getting the relationship between the seating / steering wheel position correct. The infinite adjustability of modern cars spoils us but, with a little ingenuity, can be overcome.
The underdash support bar on the 'Doon' was designed for either the fitment of a standard Beetle steering column or later modern columns (with a little modification). Anyone who has built a buggy in the past will know how lightweight traditional steering support frames can be and consequently this was one of the main areas Doon concerned was to be improved as part of their new design.
After Volksmagic owner Lee Southerton had recently successfully completed the fitment of a fully adjustable Golf Mark 4 steering assembly to a 1972 Beetle it was it was decided to fit Volksworld's Doon with a similar assembly using readily available water-cooled (!) parts liberated from Volksmagic’s vast second-hand stock. Oh the joys of building cars in close proximity to a well stocked breakers yard!
On this occasion parts from a Polo Mark 2 (lower column) and a Polo Mark 4 (upper assembly and steering wheel) were combined and when linked to the existing Beetle steering box provide our Doon with a modern wheel, complete with switchgear. A massive bonus over stock type 1 fitments.
Anyone wishing to take this one step further should take a look at Doon’s own demonstrator buggy which uses a fully adjustable New Beetle steering column and switchgear – made possible by the new steering support bar design. (For anyone wishing to carry out a similar modification, Volksmagic are able to offer a full kit of parts. Contact Lee for further details and tell him Volksworld sent you!)
The key to getting the right position is loosely bolting up the column to the support bar and placing the seat on temporary supports (such as wood blocks or metal off cuts). Once the driving position was comfortable and agreed - with 'Mr Average' sitting behind the wheel - the bolt holes for the seat runners and steering brackets were marked-up. If you are building a buggy take time during this part of the build as being able to drive in comfort can make that long cruise to the beach (or shops, or show, or….) even more enjoyable and may even allow you to emerge feeling good and looking cool, rather than tacking on the posture of some prehistoric cave dweller!
The seats for Project Doon were kindly supplied by our good friends at Midland Wheel Supplies, who donated us with a pair of Corbeau satin black 'low-back' vinyl Classic Buckets. (Vinyl is good in that if you are caught in the rain, they dry quicker than traditional cloth seats!)
Once the locating holes were drilled through the floor pan, the runners were bolted in place and secured using both metal plates underneath and washers above. This helps to spread the load and prevent the seats breaking free in the event of an accident (and also pleases the MOT man).
The final fine adjustments were then made to the position of the steering column before the column was removed, treated to a coat of satin black paint and then finally bolted into position.
One of the main features of the new 'Doon' design is the opening front bonnet, which allows easy access to the fuel tank. This means no more cutting holes in the bonnet moulding for the filler neck to protrude.
Although you can use a standard 12V Beetle tank, it is best if the filler position is modified slightly, moving it to the top of the tank, rather than the side. This allows the tank to be filled to the brim, giving you a good cruising range, rather than having a tank half full of air!
The old filler is cut out and the opening plated over, whilst a new aperture is cut into the tank and the neck (from an older Beetle complete with either a lockable / screw cap) refitted. This work is carried out by braising the parts in place, rather than the use of welding. The later can lead to the welds containing miniscule holes which can lead to leakage, also the greater heat used in welding can lead to the parts suffering distortion.
This work is safer to carry out on a new 'unused' fuel tank, rather than a second hand one - due to the possible presence of petrol fumes! If you have no option, but to use an old tank, take great care. Thoroughly wash the old tank out with water to remove all traces of the old fuel and then leave it to dry out naturally.
John Clewer – November 2004
|
|