| |

Welcome to the second part of our series on building our Doon buggy, the very same one which you can win in our free to enter competition.
In this months issue we take a look at the building of the front and rear suspension, finally getting our Doon on four wheels.
In last months feature we detailed the restoration of the chassis and whilst Volksmagic proprietor Lee Southerton was carrying out the hard work, many of the components that would be required later in the build were stripped apart and sent away for shot blasting. Upon their return some, including the gearbox, were painted in two-pack satin black, whilst others were anodised silver.
With the chassis raised to a convenient height to work upon, the front of the frame head was liberally coated - and filled within - with Waxoil. Only then was the new bare front Puma beam, now also sprayed in satin black offered up to the mounting points.
Just because buggies are plastic everyone thinks they won’t rust. Whilst the shell won’t rust, it does not mean that the chassis won’t suffer. Because of the lack of full bodywork, especially around the front they collect all sorts of rubbish around the edge of the pan and corrosion can still be a problem.
Lee's motto is “do it once and do it right!” and he always uses loads of Waxoil, grease and tries to protect everything where and when he can, using modern spray sealer to cover all chassis joints.
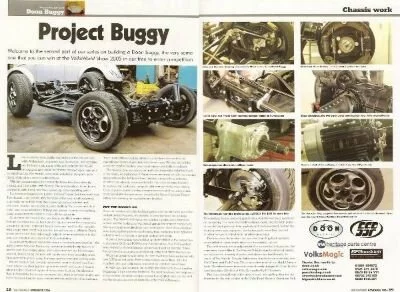
As we were bolting up the new beam, we took the opportunity to fit castor shims behind the lower torsion bar tube. These are simply sandwiched between the tube and the frame head and their use helps to correct the suspension geometry on any type 1 chassis which has been fitted with lowered suspension, as well as aiding straight-line stability.
The normal, standard length, bolts are used for the top pair, with longer than stock being required for the bottom ones, once again Lee took great care to use loads of grease on the head bolts before tightening.
With the Puma beam (pre-fitted with its ratchet style height adjusters) securely bolted to the pan, our attention was switched to its rebuilding and the fitting of both the braking and suspension components.
When fitting the torsion leaves into the new beam, it’s a neat trick to use plastic zip ties to secure the stack of leaves together as they are withdrawn from the old beam. Then when they are re-inserted into the beam - taking great care to feed them correctly through the central mounting block - the trailing arms ride over the torsion leaves and push the zip ties out of harms way. The trailing arms, which had previously been masked up, blasted and painted, before being cleaned with spirits prior to re-assembly, are then secured in place using the large grub screws and locking nuts.
Before being fitted the stub-axles were sent to a local machine shop where the steering arm eyes were machined out to 17mm to allow for the fitment of a pair of bump steer bushes.
On a lowered type 1 chassis the track rods can sometimes work at extreme angles, this may lead them on occasions to even make contact with the underside of the fuel tank! Therefore, the fitment of these bushes, allows the outer track rod ends to be repositioned upside down and out of harms way. At this time we also took the liberty of re-fitting the eccentric camber bushes which had also taken a trip to the anodisers!
The steering box was relocated and bolted up on the right hand side of the beam. It should be remembered that all replacement Puma beams are initially supplied with the steering stop positioned for left hand drive. Though it should be mentioned that they can now be purchased, at extra cost, already converted to RHD. In our case the old stop was removed from an original beam and, after careful measurement, welded onto the new beam.
Once the steering box was in position then the track rods - complete with new rod ends - were refitted. Once in place, a new steering damper was mounted up using a trick aluminium billet damper mount (supplied by SSP) rather than welding in place an original mount.
Attention then turned to the braking system and it was decided that, as our Doon would be so light on the front-end, we would keep the stock drum brake system as this would be more than sufficient for the job in hand.
The blasted and repainted front back-plates were therefore refitted and the braking system rebuilt using all new stock components. Once Lee was happy that everything was OK, the new drums were fitted and secured in place. Rear slave cylinders were used as they provide less braking than traditional front cylinders to further reduce the risk of the front brakes locking-up.
Due to our chosen wheels being Porsche fitment, a pair of new drums were welded-up and re-drilled to the correct five stud pattern (5/130mm PCD), by a local machine shop. This meant that the fitment of the rims would be an easy bolt on job.
With the front beam now complete it was time to turn our attention to the rear end. The 1600 gearbox was cleaned up and reconditioned before being sent away for blasting. Upon its return it was also painted in two-pack satin gray. The box was then bolted up to the chassis using new Urethane mounts.
Whilst the swing axle gearbox was away from the chassis, Lee took the opportunity to replace the rear bearings with new SSP sourced parts. New rubber gaiters were fitted, with the supplied nuts and bolts being replaced by stainless steel items.
The good thing about building a project car in a VW yard is the opportunity to try different parts and fitments and a while ago, Lee began to use readily available parts to put together Volksmagic’s own rear-disc brake kit.
The most troublesome component to source was the actual calliper mount, but eventually a pattern was constructed and the mounts are now easily produced to order, by one of the many local engineering firms with whom Volksmagic do business.
The existing brakes were stripped down, with the bearings being replaced as necessary. The new disc brake calliper mount is then fitted in place of the old back plate and the gaskets and seals renewed, before the bearing cover is replaced. The brake parts were then treated to either two pack satin black, or silver anodising, as appropriate.
The rear discs themselves are sourced from the Bug Pack catalogue and are non-ventilated items, which slip onto to the existing splines. The callipers, in this case new Beetle (with floating brake pads) though Golf Mk4 ones will also do the trick, are then mounted onto to the bracket.
The front wheels were easily mounted to our new front drums, but the rears were to prove more of a problem!
It was decided that the wheel of choice for our Doon was to be the Porsche Teledial, as they came in a variety of widths and diameters.
Ian Heward, the owner of The Porsche Shop in Halesowen donated a set of wheels, size 6”x15” front and 8”x16” rear. These were then coated in a stunning ‘Black Chrome’ finish, this is an interesting sort of Graphite colour which looks great with the Volksworld s own choice of body colour.
Once returned to Volksmagic, the wheels were treated to a set of newly designed BFG road tyres (size 225x16 and 195x15).
With the chassis now rolling, we brought the two halves of the project together for the first time and we were ready for the cars debut at the Volksworld Show at Sandown Park.
John Clewer - 2004
|
|